Showing posts with label ENFILADE Report. Show all posts

Monday, June 10, 2019

Sharp Practice AAR Enfilade 2019

Well my two table Sharp Practice Scenario previously presented here, went well at the NHMGS ENFILADE Convention this past Memorial Day weekend. It achieved the result  of keeping everyone occupied and busy the whole game. Was a bit chaotic and I could have use some help running the game, but the played seemed to enjoy it.  The outcome was a bot mixed however and wargamers will always find a way to break any scenario.

The background to the Scenario is that the Rebels have made a raid into British territory and made off with a wagon load of arms and ammunition needed to arm the local Militia. They are being pursued by a force of British and must make it across a bridge to escape. Another Force of British is arriving in front of them to block their access to the Bridge. The British also need the arms to give to their  own loyalist Militias. A river runs between the two table and is impassable terrain, so the only way to escape is across the bridge.

Meanwhile on the other table(Table A) a Rebel force is arriving from the North to hold the Bridge open for the escaping Wagon. A British Force with Tory Provincials is arriving from the South to prevent this.

 Since the previous Scenario presentation, I resided things a slight bit. I added another unit of skirmishers to each side so the players on each side and on each table would each have two units to command. I moved the terrain around slightly to allow units to deploy into line on the road on Table B.


 I made Rosters for each force on each table with pictures of the Leaders matching the card decks. This way, players could find their leaders and units more easily than if they just had numbers. Even so, some players still got confused and mixed up leaders.


I also had cards for the  wagon Master Walter Sobchak, the two Reverends, one on each table on the Rebel side, (Rev. Hal E.Looya and Geven Brimstone) and the two Doctors on the British side,one on each table. This was to allow them easier activation in case the Force Commanders(Ldr 1) card didn't come up during play. I also use a Second Tiffin card to help keep things moving. If any Tiffin came up first, it would signal an End of Chapter per the Rules.  I've found the second Tiffin helps even things out a bit especially in Convention games.
 Finally, I added some rules to provide a chance of the wagon blowing up if hit by gunfire. They were as follows:

If Wagon is in line of fire or within 4" of a target receiving fire, then there is a chance the wagon will be hit. Count the wagon as another unit sharing dice and allocate hits against it. If any hits roll 1D6: 1 hits Driver, roll on Officer Hit table for effect; 2-3 hits a horse = minus 1 pip on movement dice for each hit; 4-5 hits wagon with No effect; 6 hits Gunpowder blowing up and affecting everything within 6" radius. Roll for each figure on Table 11 (Hit Effects) as if they were in the open and counting Any Shock as doubled.

I made sure both sides knew that preserving the weapons and ammunition on the wagon were a high priority for both sides.


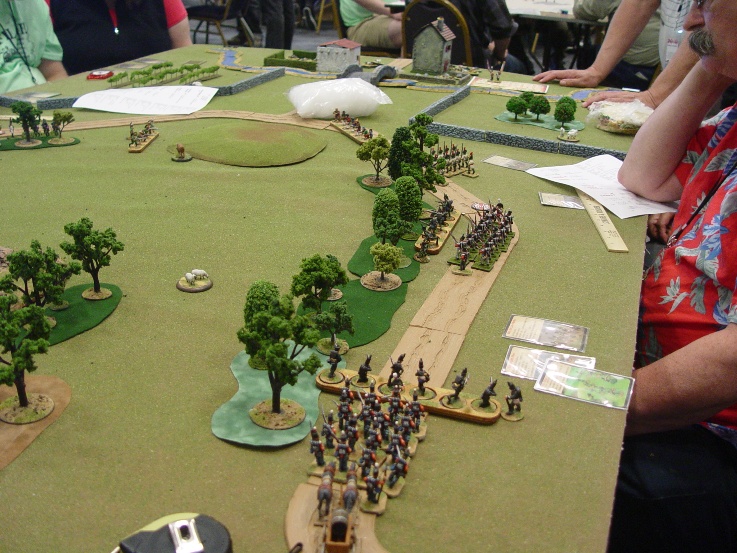
I was pretty busy running the game so didn't take a lot of pictures. In the picture below the near side is Table B. The British Regulars are occupying the blocking position on the road. It was awhile before they had any help from their accompanying skirmisher unit that was supposed to arrive on the road in the foreground on Turn 2. The Rebels used their MDP to deploy their Frontiersmen Riflemen up by the white cabin and they began to pour effective fire into the British Regulars for most of the game..


For some reason the Rebels elected to use their Main Deployment Point to deploy the Wagon and the rest of their Forces. The close pursuing British Grenadiers managed to give them some fire into their rear causing double Shock, but with the help of the Reverend Hal E.Looya they Rebels were able to recover. Where the Wagon is shown is about as far as it got. The Wagon Master, Walter Shobchak shared the hits on the Militia ans was knocked out. He recovered on his next activation, but was hit again later and killed. Why the Rebels didn't deploy the wagon using the MDP is a mystery to me.


On table A the Provincial Regulars went up the right side of the table and ensconced themselves behind the log cabin where I guess they thought them selves safe there leaving their skirmishers to carry on the fight. They eventually came out from behind the house, but not before the Highlanders had pretty much carried the day on the left side of the field. They had become engaged in a firefight with the Continentals and a Fisticuffs which drove the Table A Rebel Force Morale to Zero.


Meanwhile on Table B, The Rebel Militia along with the Frontiersmen skirmishers had whittled the British Regulars at the Road Block down to three Soldiers plus Sgt. Mal Ingerer and Captain Warren Peace. The Rebel Continentals on this side had effectively held the Grenadiers off from capturing the wagon and British Force Morale was down to two.


So the wagon could have probably gotten across the Bridge if the Rebels could find a driver for it, but once there, it had no where to go since the British had driven off the Rebels who were supposed to hold the bridge open. Perhaps that is a scenario for another time where the Rebels try to force their way through the Highlanders and the reluctant Loyalist infantry on the other side of the table.

So ends my attempt to run two separate games at one. It certainly kept everyone busy, but it was very difficult to umpire. If some of the players were more familiar with the rules it would have been a lot easier. Overall I was satisfied with the result and the players seemed to enjoy the game.


Monday, March 18, 2019

SP Scenario for Enfilade 2019

I've done Sharp Practice(SP) games at conventions and the Card Activation system on these rules always seems to leave one player sitting around waiting for his card to turn up. A couple of turns of this,does not make for an enjoyable game for that player. SP seems to work best with two or fewer players per side, but at conventions you really need to allow for six or more players per game as its just not an efficient use of a table to put on a game for two to four players.

So how to reconcile the problems with SP's card activation system and still allow for eight players in the game. This year I am trying two separate but linked games going at the same time. To do this I have divided the table into two sections with impassable terrain between them. Each section will have their own card deck and proceed at their own pace. This way there will only two players per side in each section with the possibility of interaction between the two only at the end of the game.

Below is the map of the scenario with details described below.

Scenario Description

Rebel Force B(RB) is returning from a raid into enemy territory. They have a wagon full of  supplies, ammunition and muskets they have captured. They are trying to get back to friendly territory and must cross a bridge to do so. The British have been warned of their presence and send British Force B(BB) to  prevent their escape.

On the other side of the river, a friendly Rebel Force A(RA) has been sent to hold the bridge where they must cross. Another British Force(BA) has been sent to intercept the wagons to prevent their escape.

The river runs in a deep ravine and is impassable other than at the bridge.  The terrain on either side of the river is heavy undergrowth, dense forest and rocky hillsides being classed as Really Heavy Going.
Rebel Force RB must cross the bridge and exit the North edge of Table A. The British must try to prevent the wagon from escaping.

Set Up
Each force is comprised of two units of two Groups each and one Unit of Skirmisher type infantry. Rebel Force RB with the wagon first places his Primary Deployment Point(DP) on the road 2D6 plus 6 inches from the Southern table edge. The Rebel Force RB may all enter on turn 1.

The British Force BB B may place only one unit using their Primary DP at the Road junction to the bridge during the first Turn. The remaining two units may enter anytime after turn 2 using the Southern road entrance on Table B as their Deployment Point.

Rebel Force RA and British Force BA may both enter on Turn 1 using their respective Deployment Points located at the North and South road entrances to table A. British Force BA has a Movable Deployment Point(MDP) they may use per the rules as long as the Provential Regulars are the first to make use of it. On table B, the Rebels also have a MDP which functions as per the normal rules after they place the Primary DP as described above.


Force Characteristics

Rebels

 Force RA  Total 65 points
Ldr 1 Capt. Seymore Bush Lvl III
Ldr 3 Sgt. Buster Cherry Lvl I
Continental Line   Regulars   Muskets   8figs/Group   2 Groups  7 pts/Group
Formation: Always                       Crashing Volley: 2      Characteristics: Sharp Practice
First Fire:   Yes                              Step Out:  2
Controlled Volley: Yes                   Drill:        2

Ldr 2 Lt.Moe Lester Lvl III
Ldr 4 Sgt. Rick O'Shea Lvl IMilitia   Militia   Muskets 10figs/Group   2 Groups  3 pts/Group
Formation: No Shock                   Crashing Volley: 3      Characteristics: No Bayonets
First Fire:   Yes                             Step Out:  3                                           Hearth&Home
Controlled Volley: First Only       Drill:        -

Ldr 5 Sgt Melvin Sackrider Lvl I
Miltia SK   Irregular SK  Rifles   6 figs/Group   1 Groups  7 pts/Group
Formation: No                    Crashing Volley: -      Characteristics: Sharp Practice,
First Fire:   Yes                             Step Out:  3      Hearth & Home, No Bayonet
Controlled Volley: No                   Drill:        -

Support Total 8 points
Holyman  1 point
Marksman 2 points
Water Cart  2 points
Relic 3 points


Force RB  Total  64 points
Ldr 1 Capt. Hiram Cheaper Lvl III
Ldr 4 Sgt. Frank Sansbeens Lvl I Continental Line   Elite   Muskets   8 figs/Group   2 Groups  9 pts/Group
Formation: Always                       Crashing Volley: 1      Characteristics: Sharp Practice,
First Fire:   Yes                              Step Out:  2                Good Shots, Stubborn
Controlled Volley: Yes                   Drill:        2

Ldr 3 Lt. Jason Sanborn Lvl II
Ldr 5 Sgt Luke Warme Lvl I
Militia   Militia   Muskets 10figs/Group   2 Groups  3 pts/Group
Formation: No Shock                   Crashing Volley: 3      Characteristics: No Bayonets
First Fire:   Yes                             Step Out:  2                                           Hearth&Home
Controlled Volley: First Only       Drill:        -

Ldr 2 Capt. Upton O. Goode Lvl II
Frontiersmen   Skirmishers    Rifles   6 figs/Group   1 Groups  7 pts/Group
Formation: No                    Crashing Volley: -      Characteristics: Good Shots, Movable DP,
First Fire:   Yes                             Step Out:  3      Aggressive, Movable DP, Tomahawks,
Controlled Volley: No                   Drill:        -       No Bayonet

Support Total 6 points
Holyman  1 point
MDP  2 points
Relic 3 points


British 

Force BA  Total 65 points
Ldr 1 Capt. Serge A. Head  Lvl III
Ldr 3 Lt. Pat Pending Lvl I
Highlanders   Elites   Muskets   8figs/Group   2 Groups  9 pts/Group
Formation: Always                       Crashing Volley: 1      Characteristics: Sharp Practice,
First Fire:   Yes                              Step Out:  2                 Thin Red Line, Aggressive,
Controlled Volley: Yes                   Drill:        2                 Tomahawks

Ldr 2 Lt.Duncan Doughnut Lvl II
Ldr 5 Sgt. Jimmy DeLocke Lvl I
Loyalists  Conscripts and Volunteers  Musket   8figs/Group   2 Groups  4 pts/Group
Formation: Always                       Crashing Volley: 3      Characteristics: Sharp Practice
First Fire:   Yes                              Step Out:  3                        
Controlled Volley: First Only        Drill:        -

Ldr 4 Sgt Creighton Shippet Lvl I
Loyalist SK  Skirmishers  Muskets   6figs/Group   1 Groups  7 pts/Group
Formation: Never                      Crashing Volley: -      Characteristics: Movable DP
First Fire:   Yes                          Step Out:  3                         
Controlled Volley:No                 Drill:       -

Support Total 8 points
Physic 1 point
Water Cart 2 Point
MDP 2 points 
Colors 3 points


Force BB Total  67 points
Ldr 1 Capt. Warren Peace  Lvl III
Ldr 4 Sgt. Justin Thyme Lvl I  
Line   Regulars   Muskets   8figs/Group   2 Groups  7 pts/Group
Formation: Always                       Crashing Volley: 2      Characteristics: Sharp Practice,
First Fire:   Yes                              Step Out:  2                          Thin Red Line
Controlled Volley: Yes                   Drill:        2

Ldr 2 Lt.Canby Allgoode Lvl II
Ldr 5 Sgt.Tommy Rott Lvl IFusiliers   Regulars   Muskets   8figs/Group   2 Groups  7 pts/Group
Formation: Always                       Crashing Volley: 2      Characteristics: Sharp Practice,
First Fire:   Yes                              Step Out:  2                  Thin Red Line, Aggressive
Controlled Volley: Yes                   Drill:        2

Ldr 3 Lt.Allen Rench Lvl II
Skirmishers  Light Inf Muskets   6figs/Group   1 Groups  9 pts/Group
Formation: Always                    Crashing Volley: -      Characteristics: Sharp Practice,
First Fire:   Yes                          Step Out:  3                Aggressive, Tomahawks            
Controlled Volley:No                 Drill:       -

Support Total 6 points
Physic 1 point
Breastworks 2 Point
Colors 3 points


Umpire Notes

If the Rebels can get the Wagon Across the Bridge with nothing to stop them from exiting, then game is over with it being a Rebel Victory. I suspect it won't turn out as simple as that. With the British only allowed to place one Unit blocking access to the bridge, a lot will depend on how aggressive the Rebels are on Table B. Likewise the British on Table A have to be very aggressive in case the wagon makes it to the Bridge.

I haven't yet decided how to work things out if a Unit from Table B actually crosses onto table A. The easy thing to do would be to transfer the Leader cards to the other tables Deck, but I'm wondering if they couldn't just each continue to draw cards from their own deck. If any interaction occurs they could just implement them simultaneously.

I've made my own card deck with pictures of the individual Leaders That makes it easier for the players to identify them on the Table. No more looking for a Roster to see who Leader 5 is.


Comments

Still a few things to clean up for this Scenario. I need to find another Rebel Sergeant figure to use or paint one up. Hopefully, I get some playtesting done before the convention in May. If you have any suggestions or comments,please leave them below.


Thursday, August 09, 2018

Sharp Practice Napoleonic Enfilade 2018 AAR

Race for the Bridge (Friday's Game )

This is an After Action Report(AAR) for the first of two games presented at the 2018 NHMGS Enfilade convention over Memorial Day weekend. Remind next year to not do another eight player Sharp Practice game. It's exhausting and just too big to get to a conclusion n a reasonable amount of time (i.e 4 hours).
The idea was to see how two evenly matched opponents and symmetrical terrain would perform in an identical mission, to capture a bridge. The setup for the game is described in the previous blog entry. If you haven't read that, you might want to now to know who the characters and forces are.

On the first turn, both sides opted to get as many units as possible headed toward the bridge. The French had the advantage here as their Dragoon Leader's card showed up fairly early and they were able to get quite a few troop to be able to use the French Movable Deployment Point(MVP). In SP only units designated with having an MVP characteristic are able to initiate an MVP allowing other units to follow. The Spanish Guerillas who had the MVP Characteristic didn't turn up until late in the turn forcing the British to use the Primary Deployment point. So other than deployment, nothing happened much on the first turn as the forces were out of site of each other.


On the British side the Spanish Guerillas led the way. The 89th foot and ammunition wagon was directly behind with a unit of Rifles in the woods on their left. The 45th foot hung back with the other Rifles presumably guarding the MDP.

On the French side the Dragoon skirmishers led the way racing toward the bridge. they were followed bu a column of French infantry and the 4th Polish. French Voltigeurs covered the right flank of the Column backed up by the Polish Voltigeurs in the woods. Another French Column hung back protecting the MDP.


The next turn, the Spanish Fusiliers make it onto the table and deploy 12" from the MDP, the Guerillas race into the orchard field behind the stone wall and the 89th speeds down the road in column. The French only gettwo units to move before the Tiffin comes up. The Dragoons cross into the grape vineyard field and the French column moves further down the road

Spanish skirmishers behind the wall hoping to keep the French from the Bridge. Neither side has yet had an opportunity to fire.

 French get a short turn and only the Dragoons and the French column get to move.


Things begin to get interesting. French Line and the Dragoons blaze away at the Spanish Guerillas behind the wall and manage to take three of them out. The British 89th fires at the French Line but only manages to give them some Shock. To their left the British Rifles advance to the hill to engage the French Skirmishers, but get the worst of it loosing two of their number. They only manage to put some Shock on the Voltigeurs. At the other end of the field the Rifles  advance toward the patch of rough ground trying to flank the French

Action on the British side of the field. The Guerillas have taken some kills and some Shock. British Rifles in the center get the worst of the shooting contest with the French Voltigeurs.


A view of the whole table. Lots of long range fire going on with advantage going mostly to the French


The British Rifles in the center have fallen back ans take a couple of more kills. The 89th has also lost four kills and is down to six figures per Group. British Leader 5, Sgt. Bonner has also been wounded.The Spanish Fusiliers make iti nto the Orchard field and get ready to support their skirmishers who are still hanging on.The 4th Polish and the Dragoons continue their rush to the Bridge while the Polish Voltigeurs move up to put some more fire into the Rifles. At the other end of the table, the French Line boldly deploy into the open with the British 45th timidly hugs the tree line. While some musketry and rifle fire goes on here it doesn't result in much effect.


Spanish Fusiliers come up behind the Guerillas. French and Polish Voltigeurs fire at the Rifles.


French Dragoons and Polish Infantry approach the bridge. Fire from the British and Spanish doesn't seem to stop their advance.


View from the opposite of the field. French Line approach the rough ground.


End of the gaming period signals the end of the game. The Polish Line and French Dragoons have moved onto the Bridge and its questionable although possible the British and Spanish could dislodge them. Polish and French Skirmishers have finally caused the Center Group of Rifles to retreat off the field.although the French Skirmishers have taken enough Shock to cause them to retire. French line and 45th British fire away at each other at the other end of the field but it is too late to make any difference. With the British loosing more casualties and the French holding the Bridge, the advantage seems to be with the French and they are deemed the victors.


The Polish Line and French Dragons holding te Bridge.Its doubtful the Spanish can take it from them as they are classed as "Poor Shots" and are lower quality.

Action at the opposite end of the table. Looks like the French and Rifles are still untouched while the 45th has taken some shock.Too late to make much difference here.

An overview of the whole table. I decided the victory belonged to the French although a few more turns might have made a difference. End of gaming period equates to night falling and British retire to regroup and the French consolidate their position. Maybe if Richard Sharpe and Sgt. Harper were there it might have made a difference.


No Fisticuffs in this game which made it somewhat uneventful, but the players had fun and got to experience playing the rules.Large Convention games with Sharp Practice are hard to do as someone usually ends up sitting waiting to get to play. You can see that by how long it took the Spanish to get into position and how little the 45th British were able to do. If I do SP again at a Convention, I think I would divide the table up into two separate battles with their own set of activation cards.
******************************************************************************

Saturdays Game

I put on the same game on Saturday but was too frazzled to take enough pictures to document the game. It was a little more interesting as we got into some fisticuffs and had a different ending.
Force Morale at the end was British 4 and the French 5, but the Spanish Guerrillas held the Bridge. I would have to call it a draw as it could have gone either way. It was much more interesting game. The British 89th was charged a couple of times and was very shaky at the end. I think the French even used a Pas de Charge. Wish I taken more pictures, but here are three that show some of the action.

French side shortly after the Deployment turn. As in the first game most of the troops race down the road to get to the Bridge. The commander of the 4th Polish however took a different tack and headed straight across the field to get into action.

 The British side after deployment with the Spanish in the lead


 This is at the end of the game. The Guerrillas hold the Bridge way down at the end of the table. The Spanish Fusiliers and the 45th British are opposed by two Formations of French Line. All have taken a fair amount of Shock. The Poles are in the foreground after having driven the 89th back in Fisticuffs. This was after rolling a "9" of the shooting random event Table: (“Charge them to Hell!” Inspired by their volley and convinced the enemy is done for, the firers surge
forward 2D6 inches. If they make contact, they fight Fisticuffs immediately and are counted as
Aggressive in the first round of that fight.  )

Hope you found this interesting. Comments always welcome and if you are in the Pacific Northwest next May, check out the NHMGS ENFILADE Convention.

Saturday, June 03, 2017

Enfilade 2017 SPv2 After Action Report

Another Sharp Practice v2 AWI After Action Report. This time from the Enfilade 2017 Convention Sunday gaming session. I also did a game on Friday afternoon, but the Sunday one was more interesting. It's a meeting engagement between a mixed Rebel force of Continentals and Militia versus British Regulars and a unit of Provincial Legion Forces. Summary of opposing forces is as follows:


Points total was 120 for the British and 117 for the Americans. Five Command Flags for each side were used. Force morale for both sides started at ten.To speed up the game, troops were already deployed on the table. There was no Deployment turn. This was done to speed up the game and get players into the game immediately, however, each side had a Deployment  Point on their side of the table at the road entry point. This was done solely to provide an objective to capture. Also, no Tiffin Card was used to prevent one player not getting activated for several turns which was a problem in SPv1. Players opted to leave the troops where I had originally placed them on the Table. So the initial set up and beginning moves was as depicted below.


Below we see the opening moves. The British Skirmishers have all moved up to the center fence or wall. The Fusilier Skirmishers have actually crossed the fence and entered the orchard where they are trading shots with the Milita Frontiersmen skirmishers. The British Regulars in the background have moved to the center of the hill where they will stay for the rest of the game.

The Militia are advancing down the road toward the Highlanders. At the nearer hill on the right,the VA State Line has crossed over the hill and is about to fire into the Highlander Skirmishers defending the wall.

In the foreground, you can see the DE skirmishers have made it to the wall while their brothers in Line are lagging behind. One stand of the British Legion can be seen by the farmhouse on the left.


 A little closer view of the middle and Rebel right side.


 A view from the British right flank where the Legion has crested the hill.


 View from the Rebel right Flank showing the MD Continentals having moved up to the fence after destroying the skirmishers in front of them. In the background, you can see that the Highlander skirmishers have also disappeared. British Force moral at this point was down to about seven.


  The VA State line having cleared the skirmishers in front of them are about to wheel and fire into the Highlanders. It seems most players were content to just sit and shoot at each other at long range.


 Rebel right side showing Maryland troops trading fire with Brits on the hill. Neither player here wanted to get into Fisticuffs so sat in this position the rest of the game.


View from the British right Flank. In the foreground are figures killed. Things definitely in favor of the Rebels at this point.


 Things starting to change now. In the background,the VA State Line has wheeled and put some shooting casualties on the Highlanders. Looks like about four figures left on the Highlander Group on the right.

In the foreground, the Fusiliers used a Thin Red Line Command to fire and advance into fisticuffs with the SC Militia. Poor Militia(No Bayonets). Ouch!


 Militia lost the melee and has ruted back out of site. MD troops still sitting at the wall. No Guts! No Glory!


 The Highlanders have been forced to withdraw. British Force Morale was down to four at this stage. On the other side, the Militia is in bad shape and looks like the Frontiersmen have finally been driven off by the British Skirmishers. Rebel Force Morale was at one.

With nothing to prevent the British from capturing the Rebel Deployment Point, we ruled the game over.


 A view of Rebel left Flank.


 Rebel right Flank

Most of the payers were familiar with SPv1and had bought v2, but hadn't yet played it. They were glad to have the opportunity to try it out. It was actually pretty close and more aggressive Rebel players might have swung the game the other way.

I was surprised that most players were content to engage in long range musket fire rather than come to grips in Fisticuffs. On the left the Delawares were an Elite unit and should have made short work of the British Provincial Legion. Same on the right where the three Groups of Marylander's had a good chance of defeating the two British Groups of Regulars.

In my opinion, it would be better to save one's First Fire for close range and combine it with a Controlled Volley with perhaps a Crashing Volley if the Command Cards are available in order to get the maximum effect. Then you move into Fisticuffs for the kill.

Hope you enjoyed this report and learned something from it. Comments always welcome.  Figures used were mostly from GAJO Minis the exception being the SC Militia and Frontiersmen which I painted.