Monday, September 10, 2018

Bad Day at Black Rock(An AWI Skirmish with SPv2)


 Our local Group of wargammers indulged me with another game of Sharp Practice, this time an American Revolution period scenario. I used Scenario One from the rule Book, a Meeting Engagement where each side rolls to see where they place their Deployment Point. The British got Point 1(Red arrow below) and the Rebels at Point 2(Blue arrow). Unfortunately I had brought the wrong CigarBox Battle Map to the game. I had picked up the Nashville map instead of the European 102c map, so we ended up with more woods than I wanted. The CigarBox Maps are a little bigger than the 6X4 tables we have down at the local game store(Blue Sky Hobbies in Bremerton, WA) so about four inches hang down over the sides of the table. That's why the primary Deployment Points shown below are so far in from the edge. Only one Deployment Point per side is used so it was a little crowded getting onto the table. To win a victory one side must force his opponent to withdraw from the table, either voluntarily or due to a reduction in his Force Morale. Both sides roll Low for their Force Morale(the rebels being -2 for more than half their force being Militia) and both start out at Force Morale of 9.


The Forces in this encounter are somewhat small, about 65 points each. The British have two Groups of Highlanders(Regulars) one Group of Light Infantry Skirmishers and three Groups of Provincial Regulars(Conscripts & Volunteers). The Rebels have a three Group Unit of Continentals and two Units of Militia, each of two groups, one without bayonets. This would be a typical skirmish between the forces of Nathanael Greene  and Banastre Tarleton somewhere in South Carolina in the year of 1781. Below is the Roster of Troops with their leaders and Support Options. The battle is set in the fictional town of Bad Rock somewhere in South Carolina.


The first turn sees the Rebels all deploy in the field behind the church. Its a little crowded but they all fit within the six inch distance around the Deployment Point.


The British deploy in the open space between the two streams. The Skirmishers with their nine inch deployment distance set up lining the road.


Captain Goode's Militia head for the church. One Group under the Captain takes cover inside the church while the other under command of Sergent Rick O'Shea must remain outside although there are some woods and a picket fence providing some cover.

The other Rebel Militia unit(w/o bayonets) under Lieutenant Lester decides to head around the church. Unfortunately for the Lieutenant, he sprains his leg( A "My bally leg!" random event) and must limp around at -1 pip per die. He encourages his men to move on while he tries to catch up.


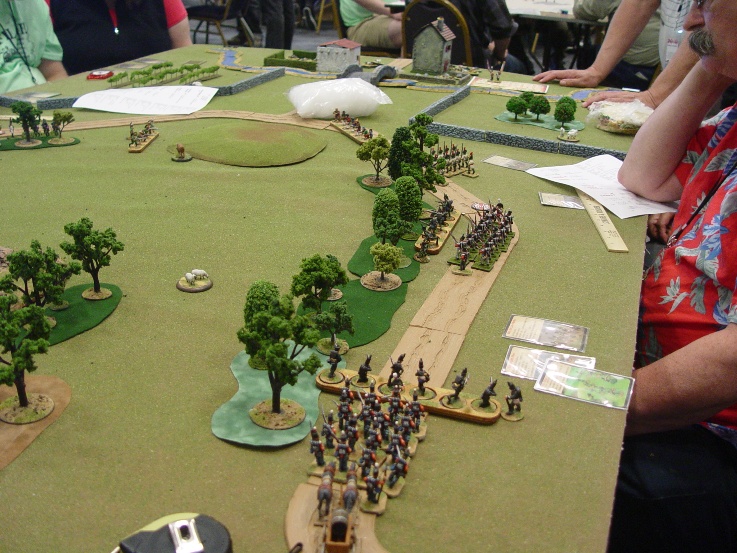
The Continentals under Captain Bush cross into the livestock field in column. A small hill is in front of them is blocking sight to the British.

The Highlanders under Captain Head are on the edge of a woods facing the church. The skirmishers under Lieutenant Rench are also facing the church and will shortly be trading fire with the Rebel Militia. The Provincial Regulars under Lieutenant Canhandle are coming up to face the Continentals but are delayed due to passage through the woods.


Lieutenant Lester's Militia must have been discouraged by the injury to their leader as they don't advance very far while the other Militia is all ready hotly engaged with the British. (Note: a combination of poor movement die rolls and a series of non-activation can cause units to be left out of the action)


After some maneuvering Captain Bush deploys the Continentals into line and advances to the crest of the hill. There he has the troops present and lay a Crashing Volley into the Provincials and British Skirmishers.


The Green coated Provincials take a thrashing. Twelve Shock on the Formation and five dead including their lackluster commander, Lieutenant Morgan U. Canhandle. Sergeant Jimmy DeLocke with trepidation, is forced to take over the Unit. Captain Head from the Highlanders has moved over so he can assist activating units with his longer command range. Unfortunately for him, he is in the line of fire and takes a hit. His wound causes him to loose an Initiative level. Dr. Payne hurries over to treat his wound but he will be out action while this is done and the Brits need his ability to remove Shock.


Meanwhile, the Continentals have also suffered casualties in the fire fight. Two are dead and there is a total of  nine shock on the two Groups on the right side. The left hand Group had miraculously suffered no casualties or Shock.


Lieutenant Lester's Militia are slowly moving up but are not within range yet. Meanwhile, Captain Goode's Militia are holding their own in the fire fight with the Highlanders and British Skirmishers.


The Highlanders suffer from  damp powder( A "Damp squib! " random event) and will fire at half effect until they can be replenished. Fortunately, the powder wagon is right behind them and it moves up to supply them with new ammunition.


The fire fight on the Rebel right flank continues and both sides are getting worn down. Captain Bush calls on Reverend Hal E. Looya to encourage the men. On his first attempt to remove shock he rolls a "3". The next attempt, only a "1". Somehow the fear of God does not help the morale of the Continentals, but they hold on and keep pouring shots into the British. Perhaps an issue of rum would have done better.


Lieutenant Lester has finally gotten his Militia into position, but he lags behind no doubt due to his bally leg. Captain Goode's Militia come out of the church and join up with Sergeant O'Shea's Group.


The Militia units begin to poor some heavy fire into the Highlanders and the Shock mounts up. Meanwhile the Provincials and British skirmishers pull back behind the rail fence to recover from mounting shock while the Continentals advance toward them. At this stage Force Morale is at "7" for the British and "9" for the Rebels.


The British with several units close to reaching break point, a wounded Force Commander and one dead leader, decide discretion is the better part of valor and retire off the battlefield leaving the village of Black Rock in the hands of the Rebels. The Continentals yell insulting taunts at them as they retire off the field.

In a parley after the battle, the British arranged for the Lieutenant of the Provincials to be buried in the Church cemetery near where he fought. He was well liked by his men and the other Officers. A collection was taken up to pay for his tombstone on which they had inscribed this Epitaph, "The Lieutenant had a Bad Day in Black Rock. It was more than he could handle".

Afterthoughts:
The dense terrain hindered both sides but probably more so the British. Once the Shock built up, it was impossible for the British to advance and engage the Rebels in Fisticuffs since they would be deducting movement pips for both shock and terrain. Its in melee where the British have a significant advantage over the Rebels, especially against Militia units with no bayonets.

The "crashing volleys" of the Continentals put the Provincials at a disadvantage due to increasing Shock which is was hard for them to recover from once they lost their leader and their Force Commander was wounded.

I thought it was a fun game and shows what can be done with just a few Units in Sharp Practice. I liked the way the Random events played into the narrative of the game. Hope you enjoyed this After Action Report. Much thanks to Gary, Kevin and Tom for playing the game with me.


Thursday, August 09, 2018

Sharp Practice Napoleonic Enfilade 2018 AAR

Race for the Bridge (Friday's Game )

This is an After Action Report(AAR) for the first of two games presented at the 2018 NHMGS Enfilade convention over Memorial Day weekend. Remind next year to not do another eight player Sharp Practice game. It's exhausting and just too big to get to a conclusion n a reasonable amount of time (i.e 4 hours).
The idea was to see how two evenly matched opponents and symmetrical terrain would perform in an identical mission, to capture a bridge. The setup for the game is described in the previous blog entry. If you haven't read that, you might want to now to know who the characters and forces are.

On the first turn, both sides opted to get as many units as possible headed toward the bridge. The French had the advantage here as their Dragoon Leader's card showed up fairly early and they were able to get quite a few troop to be able to use the French Movable Deployment Point(MVP). In SP only units designated with having an MVP characteristic are able to initiate an MVP allowing other units to follow. The Spanish Guerillas who had the MVP Characteristic didn't turn up until late in the turn forcing the British to use the Primary Deployment point. So other than deployment, nothing happened much on the first turn as the forces were out of site of each other.


On the British side the Spanish Guerillas led the way. The 89th foot and ammunition wagon was directly behind with a unit of Rifles in the woods on their left. The 45th foot hung back with the other Rifles presumably guarding the MDP.

On the French side the Dragoon skirmishers led the way racing toward the bridge. they were followed bu a column of French infantry and the 4th Polish. French Voltigeurs covered the right flank of the Column backed up by the Polish Voltigeurs in the woods. Another French Column hung back protecting the MDP.


The next turn, the Spanish Fusiliers make it onto the table and deploy 12" from the MDP, the Guerillas race into the orchard field behind the stone wall and the 89th speeds down the road in column. The French only gettwo units to move before the Tiffin comes up. The Dragoons cross into the grape vineyard field and the French column moves further down the road

Spanish skirmishers behind the wall hoping to keep the French from the Bridge. Neither side has yet had an opportunity to fire.

 French get a short turn and only the Dragoons and the French column get to move.


Things begin to get interesting. French Line and the Dragoons blaze away at the Spanish Guerillas behind the wall and manage to take three of them out. The British 89th fires at the French Line but only manages to give them some Shock. To their left the British Rifles advance to the hill to engage the French Skirmishers, but get the worst of it loosing two of their number. They only manage to put some Shock on the Voltigeurs. At the other end of the field the Rifles  advance toward the patch of rough ground trying to flank the French

Action on the British side of the field. The Guerillas have taken some kills and some Shock. British Rifles in the center get the worst of the shooting contest with the French Voltigeurs.


A view of the whole table. Lots of long range fire going on with advantage going mostly to the French


The British Rifles in the center have fallen back ans take a couple of more kills. The 89th has also lost four kills and is down to six figures per Group. British Leader 5, Sgt. Bonner has also been wounded.The Spanish Fusiliers make iti nto the Orchard field and get ready to support their skirmishers who are still hanging on.The 4th Polish and the Dragoons continue their rush to the Bridge while the Polish Voltigeurs move up to put some more fire into the Rifles. At the other end of the table, the French Line boldly deploy into the open with the British 45th timidly hugs the tree line. While some musketry and rifle fire goes on here it doesn't result in much effect.


Spanish Fusiliers come up behind the Guerillas. French and Polish Voltigeurs fire at the Rifles.


French Dragoons and Polish Infantry approach the bridge. Fire from the British and Spanish doesn't seem to stop their advance.


View from the opposite of the field. French Line approach the rough ground.


End of the gaming period signals the end of the game. The Polish Line and French Dragoons have moved onto the Bridge and its questionable although possible the British and Spanish could dislodge them. Polish and French Skirmishers have finally caused the Center Group of Rifles to retreat off the field.although the French Skirmishers have taken enough Shock to cause them to retire. French line and 45th British fire away at each other at the other end of the field but it is too late to make any difference. With the British loosing more casualties and the French holding the Bridge, the advantage seems to be with the French and they are deemed the victors.


The Polish Line and French Dragons holding te Bridge.Its doubtful the Spanish can take it from them as they are classed as "Poor Shots" and are lower quality.

Action at the opposite end of the table. Looks like the French and Rifles are still untouched while the 45th has taken some shock.Too late to make much difference here.

An overview of the whole table. I decided the victory belonged to the French although a few more turns might have made a difference. End of gaming period equates to night falling and British retire to regroup and the French consolidate their position. Maybe if Richard Sharpe and Sgt. Harper were there it might have made a difference.


No Fisticuffs in this game which made it somewhat uneventful, but the players had fun and got to experience playing the rules.Large Convention games with Sharp Practice are hard to do as someone usually ends up sitting waiting to get to play. You can see that by how long it took the Spanish to get into position and how little the 45th British were able to do. If I do SP again at a Convention, I think I would divide the table up into two separate battles with their own set of activation cards.
******************************************************************************

Saturdays Game

I put on the same game on Saturday but was too frazzled to take enough pictures to document the game. It was a little more interesting as we got into some fisticuffs and had a different ending.
Force Morale at the end was British 4 and the French 5, but the Spanish Guerrillas held the Bridge. I would have to call it a draw as it could have gone either way. It was much more interesting game. The British 89th was charged a couple of times and was very shaky at the end. I think the French even used a Pas de Charge. Wish I taken more pictures, but here are three that show some of the action.

French side shortly after the Deployment turn. As in the first game most of the troops race down the road to get to the Bridge. The commander of the 4th Polish however took a different tack and headed straight across the field to get into action.

 The British side after deployment with the Spanish in the lead


 This is at the end of the game. The Guerrillas hold the Bridge way down at the end of the table. The Spanish Fusiliers and the 45th British are opposed by two Formations of French Line. All have taken a fair amount of Shock. The Poles are in the foreground after having driven the 89th back in Fisticuffs. This was after rolling a "9" of the shooting random event Table: (“Charge them to Hell!” Inspired by their volley and convinced the enemy is done for, the firers surge
forward 2D6 inches. If they make contact, they fight Fisticuffs immediately and are counted as
Aggressive in the first round of that fight.  )

Hope you found this interesting. Comments always welcome and if you are in the Pacific Northwest next May, check out the NHMGS ENFILADE Convention.

Sunday, April 29, 2018

Getting ready for Enfilade 2018

I am putting on the Race to the Bridge Napoleonic Scenario at the NHMGS ENFILADE convention this coming Memorial Day weekend in Olympia, Wa. Our group will be using a 5 ft X 8 ft table for our games, so I have enlarged the map a bit from the previous game.  Here it is just below:


You can see I've changed a few things. The woods now run along the side of the roads instead of being in clumps. This will allow troops from both sides to move quite a bit before being spotted. The hill has now been placed in the center just in front of the junction of the the roads. The British side now also has a walled enclosure with an orchard. This evens up the map so both sides have the same advantages. I'm also thinking of putting some buildings across the river so if one side gets across the bridge they would have some cover to hide in.

To accommodate more players, I've increased the forces to allow up to four played per side. I don't think SP plays well with that many players, but its a convention so it is what it is. Game is mostly to give gamers an idea of how the rules work and encourage them to play the rules on their own. Hopefully maybe they will become so enthused,they'll put on an SP game at next year's convention so I won't have to.


  So below is the French Side. I've geared the game for three players a side so each player has two Groups of Formed infantry and one  Group of Skirmishers. If there are four players, one can move the Skirmishers. First is a Unit of Poles(4th Regiment Duchy of Warsaw) who fought in the Peninsula in French service. It consists of six Voltigeurs, eight Grenadiers and eight Regulars.

Next is the main French force with two Groups of Regulars and one Group of Voltigeurs. I saw an ad for here on TMP for female Napoleonics from Elite Wargames & Models (Elite Wargames and Models)
and had to pick some up. So I gave the French player the option to use either Lieutenant Yvette Bardot or Sergeant Emil Fortu to lead the Skirmishers. (See picture below)

Lastly is another two Groups of French Regulars, but with dismounted Dragoons as the skirmish element. I did this because I like variety in the forces, they look good on the table, and it allows me to borrow from the TooFatLardies Contra Guerilla List French Gendarmes  and give them the Movable Deployment Point characteristic. I thought about providing them as an eight figure mounted unit, but decided against it as it would complicate the game and I would have to do something on the British side to even it out. .It was easier to just provide them dismounted  


On the British side there are also three groups of forces. Two are British Regulars with a Group of Riflemen as Skirmishers. In one of these forces the Regulars consist of a Group of Grenadiers and the other is light infantry company in Line. I did this to balance the Grenadiers in the Polish units and also the figures I had available were all Elite company figures. I had acquired these figures second hand all ready painted. They had front plates on their Shakos, but all had shoulder wings and the hat plume was painted white over red which is for a Center company. British Light Infantry would have a bugle-horn badge instead of a front plate so they couldn't be Light Infantry. So I re-painted the hat plumes green for the skirmisher company and white for the Grenadier company. Yes, I know. Its very anal, but I couldn't let it go.
Finally to spice things up the third Force is composed of Spanish Regulars with some guerillas as the Skirmish unit. This allowed me to use another one of the Elite Wargames figures as the skirmisher leader, Marquesa Catalina Curvallo, aka "La Garra"(the Claw).


Due to the cost of the British Riflemen(12 points) I had to give the French more Support Points to even things out. So the French received a good ten more Support Points than the British. Well see if those British Riflemen are worth the points they cost.

To make the game move faster, I've printed up the Leader cards with images of the Leader so I don't have to look at a list when a card is drawn. Here is what they look like below:


Lastly, here are some better pictures of Miss Bardot ans Miss Curvallo:


Marquesa Catalina Curvallo, "La Garra"


Lt. Yvette Bardot
I'll post an after action report after the convention in May.  It was a lot of work getting these ready. I had to paint up quite a few extra figures to flush the units out and re-stand a good third of them, but every thing is done now. Hopefully it will a lot of fun.  Constructive comments always welcome.


Thursday, February 15, 2018

Pas de Charge vs Thin Red Line

This is a play test of a Scenario I am planning to run at the NHMGS ENFILADE Convention in May, 2018. (For more on Enfilade see here: http://www.nhmgscitadel.com/enfilade/ )

For this Scenario we have two fairly equal Napoleonic forces both trying to capture a bridge somewhere in Spain. They approach from opposite sides of the map with a ridge of difficult terrain between them. The British because of the Riflemen, have a higher Points total so the forces are balanced by the French taking a Secondary and a Movable Deployment Point as Support Options. Whomever holds the Bridge or drives the opposite side Force Morale to zero wins the game. French enter from the top road, the British at the bottom. Tan spaces are difficult terrain and woods are light cover. Low stone wall provides light cover and is a minor obstacle. River is un-fordable.


Each side has three Groups of Regulars and three Groups of Skirmishers. One Group of French Skirmishers are dismounted Dragoons and one Group of British Skirmishers are Spanish Guerillas. At Enfilade, I was planning to use some Vistula Legion troops so have upgraded the French to use the Polish Stats instead of the normal French values. Doing so also allows me to use equal numbers of troops on each side. Below is the Roster and Troops values. You can see each side has five leaders, one level III, one level II and three level I's. Force Morale starts at ten for each side

To keep the game moving, I made two mods to the rules. One, the first movement die roll is always a "six". This gets rid of a lot of fiddly movement and progresses the game better. none of this moving only two inches with a bad die roll. Second, we used two Tiffin cards to give everyone a better chance of getting to activate during the turn. Turn doesn't end until second Tiffin card is drawn, but if one comes up as first card,that an "End of Chapter" event.

 A view of the table layout. Troops at the end aren't really there. They're just staged there in preparation for being deployed.
 

On the first turn,  French Leaders 2 and 4 cards come up and they can deploy their skirmishers up to 18" away using the secondary Deployment Point. Group Sk1 heads for the central rough ground while Group Sk2 heads for the upper woods. On the British side, Leader 2, Lt. Rod Stiffington and overall commander Leader 1, Capt Harry Baals are both activated brinking Sk1 and the main line with them. Lt. Stiffington heads toward the central woods with Group Sk1 and Ldr 1 heads down the road with Groups Ln1 and Ln2. He detached Group Ln3 with Sgt.Bonner to support the skirmishers.


French Deployment of skirmisher Groups Sk1 & Sk2 with Ldr 2, Lt. Alain Contri and Ldr 4, Sgt. Emil Fortu

Initial British Deployment. British Ldr1, Capt. Harry Baals has dispatched Ldr 4, Sgt Sirius Bonner with Ln3 off on their own.


In the next couple of turns the remaining Forces all arrive.  French Leader 1, Capt Marcel Surbuti deploys at the 2nd DP with the French Line troops and promptly marches down the road in column. The Spanish Guerillas( Group Sk3) and the other British Riflemen (Group Sk2) arrive with their respective leaders and head towards the center of the field. Capt Baals with the main Groups of British Line continue marching down the road. Sgt Bonner with Ln3 figures the skirmishers have enough support and heads off to support his Captain. Meanwhile both French and British skirmish Groups Sk1 head into the adjacent woods and begin trading shots with each other. Three French and two British skirmishers are soon killed and each Group begins to accumulate some shock. Some where in this turn or the next few, French Ldr 2, Lt. Contri is wounded and drops to a level one. The other French Skirmisher Group( Sk2), also moves into the adjacent woods and begins trading fire with the Spanish and British Sk2. Finally, French Dragoon Lt.Odur is activated and they deploy from the Movable DP into the walled grape orchard.


View of the British side of the field. Regulars with Capt Baal marching down the road toward the bridge. Sgt Bonner slightly behind with Group Ln3. French skirmishers in the foreground. Amazingly the Spanish Guerillas and British Riflemen Sk2 took no casualties in spite of spending quite a bit of time in the open. They did take some Shock though.

Capt. Surbuti marching down the road with all three Groups of French Line. Dragoons are taking cover behind the orchard walls which gave light cover.


Before the main French column advances down the road, the French Dragoons take a couple of casualties from the British Ln1 & Ln2 who are deploying into Line formation. British Riflemen Group Sk2 decide being in the open is no fun and move into cover of the woods. British Skirmish Group Sk1 takes another casualty in their fire fight with the French skirmishers.


French column bravely advances down the road after British have put a couple of casualties on the Dragoon skirmishers, Sk3. Whomever gets Initiative first next turn may be the deciding factor.

 
British Riflemen Group Sk2 wisely moves into the cover of the woods.Spanish have luckily accumulated no casualties, but are incurring Shock. Other Skirmisher groups continue trading fire.


Capt.Surbuti(French Ldr 1) has his troops deploy into Line and they get some good shots into the British Line causing about five kills. They take one kill in return plus some Shock. The French Dragoons get a kill on British Ln3, but are charged by them and suffer badly. The Dragoons rout back and due to excess Shock retire off the field. Elsewhere the Spanish Guerillas finally decide to move into cover. Sporadic skirmishing fire continues between the opposing skirmishers. Loss of the Dragoons and their leader along with the previously wounded Ldr 2, reduces French Force Morale from 10 to 5. 


French Line put some casualties on the British Line. They have three Groups to two so its understandable. British Ln3 has driven the Dragoons off in spite of the Dragoons have the advantage of defending an obstacle. Skirmishers must be no match for Line troops. A nice melee result for the British which may allow them to put some enfilading fire into the French Line.
 

View of firefight from the British side. Shock is building up on some units so something will eventually give.


 A very decisive turn. British Ln3 moves to flank the French Line but their firing is poor and only causes a few Shock. French Ldr1 next gets Initiative and with two Command Flags activates his formation with the Pas de Charge characteristic. This allows them to remove 2 Shock per Group and charge with 3D6. They just make it to the British Line and defeat them by 4 which with the extra Shock incurred, puts puts them off the field. British Force Morale drops from ten to three. Ouch!
Elsewhere both skirmish Groups Sk1 suffer another casualty.


Just before the French charge, British ln3 maneuvers to flank the French.
 
After the Charge. Most of figures by the hill are British casualties. Those remaining to right of hand, will withdraw  off table due to excess Shock. French line incurred quite a bit of Shock so British still have a chance to turn things around


Status of things after the French charge and melee. French Ldr 5, Sgt Leelair was also wounded in the melee.

Final turn. French Skirmish Group Sk1 has taken enough Shock that they have to withdraw reducing French Force Morale to five. Capt Surbuti gets the French Line to turn around and put some fire into remaining British Group Ln3. That along with some additional fire from French Sk2 is enough to wipe out British Ln3 reducing British Force Morale to zero.


British skirmishers all trying to put some hits onto the French Line. Unfortunately for them, the luck seem to be with the French this day. British Group Ln3 is wiped out before the French can be broken.

Thanks to Kevin Walker and Tom Condon for playing the British and to Gary Williams for so adroitly yet reluctantly(he doesn't like SP) handling the French Line troops in the roll of Captain Surbuti. I probably made some errors in this write up, but it was the best I could remember. I for one thoroughly enjoyed the game and it was good to see the French be able to use Pas de Charge to good effect for once in a game.

Some players don't like the card driven mechanics of the game because it can result in some players not being able to do anything. That's why we used two Tiffin cards, but it can still happen that some Leaders don't get activated, sometimes for a few turns. I've come to the conclusion,that SP is meant to be played between just two players. That way one almost always totally engaged in the game. With group or convention games with multiple players, some one is invariably going to get left sitting around watching other guys play. Anyone have a good fix for that, please let me know.

Hope you enjoyed this write up. Same but bigger scenario to be played at Enfilade, Memorial day weekend in Olympia, WA. We'll see there if Pas de Charge or Thin Red Line can make a difference.