Showing posts with label Nap Skirmish. Show all posts

Wednesday, September 08, 2021

 ENFILADE 2021 Sharp Practice AAR

 Blow Up the Bridge X 2

 A scenario presented at the NHMGS Enfilde Convention on Sept. 4, 2021
 
 I put on two games at the NHMGS Enfilade Convention in Olympia, WA over Labor Day Weekend. Both were the same Scenario where the French are trying to capture two bridges to make a Flank Attack on the British. The British with some Spanish Allies have been sent with a small force to blow them up. Captain Sharpe with Sargent Harper and some Rifles are attached to the Spanish to help them along. The details of the Scenario setup are given below the AAR.

The French are tasked with capturing the Left Hand Bridge which is defended by the Spanish. A detachment from the 4th Polish Regt. in French Service has the Right side Bridge to capture which is defended by the British. Unfortunately in the 1st game some of the Poles wandered over to the Spanish held bridge and helped the French which resulted in a slightly skewed game. For this reason I will only report on the 2nd game where I was a bit more forceful in the French deployments.

To keep things moving I arranged the cards so that generally two played would activate at the same time, one from the British side and one from the french side, but on opposite sides of the table. So when a Spanish Leader activated so would one form the Polish side. When a British Leader activated, one from the French forces would also. There were a few cards that were individually activated like the Sapper Officers, but for the most part two players activated at the same time but on opposite sides of the table so one didn't interfere with the other. As you look at the pictures, you'll see the table if fairly divided length wise down the center of the table by terrain to facilitate this.
 
 In the opening moves the Spanish boldly move out getting the Guerillas to the bridge. The Spanish Explosives wagon really isn't on the table yet. On the other side the British are slow to move out, the Poles having used an MDP to get down the road quicker and prevent the British from getting the extra 6 inches for hidden deployment.
  
The French deployed early and didn't get the use of the MDP and took awhile to get into action.
      
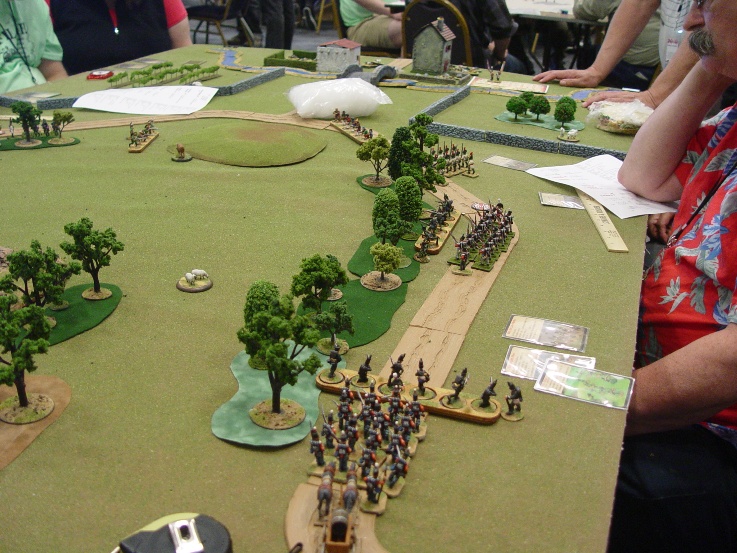
Spanish Fusiliers going across the bridge. Sharpe and the 95th rifles to the left of them. The Spanish sappers and the explosives wagon are deployed. Spanish Guerillas move forward to meet the French. In background, the British Grenadiers have moved across the bridge and there is a Light Infantry skirmish Group supporting next to the bridge.
     
British Grenadiers bravely stand their ground as the Polish Column approaches.
   
Meanwhile the French are slowly trundling down the road. With four Command cards available the polish player brings in a troop of polish Lancers. Hard to see, but there are some Polish Voltigeurs in the woods next the column.


The Poles do a "Pas de Charge", but end up two inches short. British Column moves up and take fire from the Polish Skirmishers. Meanwhile the Spanish Fusiliers have formed Line awaiting the tardy French
 
French Skirmishers finally get into action as the column moves up.
 
One of the French Skirmishers had his head blown off and I had to get the Super Glue out. (actually I fumbled the figures trying to help the French player move them)
 
The Poles attack again, but the Brits have already moved the column up to support. The odds are fairly even, but the Poles win. Unfortunately Level III Captain Studzinski of the Poles and Level II Lt. Rod Stiffington of the British Grenadiers are both killed in the fisticuffs.
 
The outcome of the melee resulted in the British Grenadiers being wiped out and the Column being pushed back. Lt. Butinski of the Polish Grenadier Group takes over command of the Polish Column.
 
The British Line attacks the Poles and force them back, but both units have taken a bit of Shock.
 
British Explosives wagon is slowly making its way to the bridge.
  
French Line is still not in the fight, but the French Skirmishers have done some damage to the Spanish.
 
The British Line nearly wipes out the Polish Column with musket Fire, but the Polish Lancers charge in and drive the British back to the Bridge. The British Wagon finally makes it to the bridge and begins to set the explosives.
  
Meanwhile the Spanish Sappers have fully set their charges and are ready to light the fuse.
  
French Line has finally entered the fight and starts to put casualties on the Spanish Line and the Guerillas, but it is too late.
  

We had to call the game at this point as the Game Period was ending, but it looked like both bridges had a good chance of being destroyed. The Poles had very little to fight with on their side and all the Spanish had to do was retreat across the bridge before it blew. However, the British Force Morale had been reduced to zero while the French were at Force Morale of 2. So technically a French Victory, but hard fought on both sides.

 
A close game with a lot of action involved especially on the Polish-British side. I was pleased with how the double activation worked as it kept all players engaged in the game. The French player seemed to be plagued by a lot of low movement rolls as it took him forever to get his main force involved. On the other side of the table to British Force Commander who activated at the same time as the French Force Commander seemed to be able to do quite a lot. He was able to move up to support his Grenadiers and drive the Poles back. He had less distance to cover however, and I think he deployed on three Command Cards earlier in the game than the French Commander did.

 Here is the Scenario Map. I changed a few things for the actual game. The terrain is slightly different and the French Entry point is in the middle rather than off to one side. This was done so that the British and Spanish Deployment points would be hidden and so give them an extra 6 inches of deployment distance. The map is from Tabletop Simulator Mod where I tested this several times in preparation for Enfilade.

Following is the Scenario setup

Some where in Spain in 1810. The French are attempting a flank attack on the British, but to do so they most hold the only two bridges across a river that bars their way. A small force of Polish and French is sent to capture the bridges before the main French attack column arrives. The Poles are assigned the bridge on the right and the French the other.

Meanwhile a combined British and Spanish force has been sent to blow up the bridges before the French arrive. As the quality of the Spanish is doubtful, Lieutenant Sharpe has been assigned the aid the Spanish along with a Group of Riflemen including Sharpe’s trusted sidekick Sergeant Harper. The British are tasked with the left side bridge and the Spanish must blow up the one on the right flank. Both must send their infantry across the bridges to allow the sappers time to set the charges and then recall their forces back before lighting the fuses.

 British and Spanish each roll 2D6 and place their DP that far along from their starting point at the Eastern edge of the table.(i.e. from where the DP markers start).

 They then deploy from their Deployment Points according to normal rules.

French enter from their Deployment Point on the road normally on the first turn however they have a MDP which must first be used by any of the Skirmish Units that have the MDP Characteristic. It is placed and used as per the standard MDP rules.

As he has been tasked to assist them, Lieutenant Sharpe can try to activate the Spanish Units, but they will not always follow his orders. Each time he tries to activate one of them, roll a D6. On a 4 through 6 they will follow his command. On a 1 through 3, they will ignore him. Sharpe looses one initiative that turn for each time he fails to activate them. 

For the Enfilade game, I added a Group of Polish Lancers that the Polish player could bring on by playing four Command cards. They arrive on the road at the Primary French Deployment Point.

The Sappers may do a Task roll with 2D6 once the Wagon has reached the center of the Bridge. Once the total reaches 12 the charges are set. Then the fuse must be laid taking one Action per 3 inches of fuse. Only one Sapper at a time can lay the fuse. It takes one action to light the fuse. 

Once lit, the fuse will burn for one turn for each three inches of fuse, blowing up the bridge when the last turn's Tiffin turns up. Any figure within 3 inches is Dead. Any beyond that but still within 12 inches rolls for being hit as if in the open with a plus 3 modifier and any Shock is Doubled. For every three inches from the 3 inch Dead zone, reduce the modifier by 1.


Here are the Forces involved with the Leader Cards so you can see how the Leaders are paired so One French and one British are activated with each Card. The only ones that activate by themselves are the Sapper Officers. A lot of times they end up being activated by the Force Commander, either British or Spanish or by Sharpe. At some point I'll add the Unit Characteristics, but players of Sharp Practice should be able to figure that out on their own.


Constructive comments always appreciated. I hope you found this AAR interesting.


Thursday, August 09, 2018

Sharp Practice Napoleonic Enfilade 2018 AAR

Race for the Bridge (Friday's Game )

This is an After Action Report(AAR) for the first of two games presented at the 2018 NHMGS Enfilade convention over Memorial Day weekend. Remind next year to not do another eight player Sharp Practice game. It's exhausting and just too big to get to a conclusion n a reasonable amount of time (i.e 4 hours).
The idea was to see how two evenly matched opponents and symmetrical terrain would perform in an identical mission, to capture a bridge. The setup for the game is described in the previous blog entry. If you haven't read that, you might want to now to know who the characters and forces are.

On the first turn, both sides opted to get as many units as possible headed toward the bridge. The French had the advantage here as their Dragoon Leader's card showed up fairly early and they were able to get quite a few troop to be able to use the French Movable Deployment Point(MVP). In SP only units designated with having an MVP characteristic are able to initiate an MVP allowing other units to follow. The Spanish Guerillas who had the MVP Characteristic didn't turn up until late in the turn forcing the British to use the Primary Deployment point. So other than deployment, nothing happened much on the first turn as the forces were out of site of each other.


On the British side the Spanish Guerillas led the way. The 89th foot and ammunition wagon was directly behind with a unit of Rifles in the woods on their left. The 45th foot hung back with the other Rifles presumably guarding the MDP.

On the French side the Dragoon skirmishers led the way racing toward the bridge. they were followed bu a column of French infantry and the 4th Polish. French Voltigeurs covered the right flank of the Column backed up by the Polish Voltigeurs in the woods. Another French Column hung back protecting the MDP.


The next turn, the Spanish Fusiliers make it onto the table and deploy 12" from the MDP, the Guerillas race into the orchard field behind the stone wall and the 89th speeds down the road in column. The French only gettwo units to move before the Tiffin comes up. The Dragoons cross into the grape vineyard field and the French column moves further down the road

Spanish skirmishers behind the wall hoping to keep the French from the Bridge. Neither side has yet had an opportunity to fire.

 French get a short turn and only the Dragoons and the French column get to move.


Things begin to get interesting. French Line and the Dragoons blaze away at the Spanish Guerillas behind the wall and manage to take three of them out. The British 89th fires at the French Line but only manages to give them some Shock. To their left the British Rifles advance to the hill to engage the French Skirmishers, but get the worst of it loosing two of their number. They only manage to put some Shock on the Voltigeurs. At the other end of the field the Rifles  advance toward the patch of rough ground trying to flank the French

Action on the British side of the field. The Guerillas have taken some kills and some Shock. British Rifles in the center get the worst of the shooting contest with the French Voltigeurs.


A view of the whole table. Lots of long range fire going on with advantage going mostly to the French


The British Rifles in the center have fallen back ans take a couple of more kills. The 89th has also lost four kills and is down to six figures per Group. British Leader 5, Sgt. Bonner has also been wounded.The Spanish Fusiliers make iti nto the Orchard field and get ready to support their skirmishers who are still hanging on.The 4th Polish and the Dragoons continue their rush to the Bridge while the Polish Voltigeurs move up to put some more fire into the Rifles. At the other end of the table, the French Line boldly deploy into the open with the British 45th timidly hugs the tree line. While some musketry and rifle fire goes on here it doesn't result in much effect.


Spanish Fusiliers come up behind the Guerillas. French and Polish Voltigeurs fire at the Rifles.


French Dragoons and Polish Infantry approach the bridge. Fire from the British and Spanish doesn't seem to stop their advance.


View from the opposite of the field. French Line approach the rough ground.


End of the gaming period signals the end of the game. The Polish Line and French Dragoons have moved onto the Bridge and its questionable although possible the British and Spanish could dislodge them. Polish and French Skirmishers have finally caused the Center Group of Rifles to retreat off the field.although the French Skirmishers have taken enough Shock to cause them to retire. French line and 45th British fire away at each other at the other end of the field but it is too late to make any difference. With the British loosing more casualties and the French holding the Bridge, the advantage seems to be with the French and they are deemed the victors.


The Polish Line and French Dragons holding te Bridge.Its doubtful the Spanish can take it from them as they are classed as "Poor Shots" and are lower quality.

Action at the opposite end of the table. Looks like the French and Rifles are still untouched while the 45th has taken some shock.Too late to make much difference here.

An overview of the whole table. I decided the victory belonged to the French although a few more turns might have made a difference. End of gaming period equates to night falling and British retire to regroup and the French consolidate their position. Maybe if Richard Sharpe and Sgt. Harper were there it might have made a difference.


No Fisticuffs in this game which made it somewhat uneventful, but the players had fun and got to experience playing the rules.Large Convention games with Sharp Practice are hard to do as someone usually ends up sitting waiting to get to play. You can see that by how long it took the Spanish to get into position and how little the 45th British were able to do. If I do SP again at a Convention, I think I would divide the table up into two separate battles with their own set of activation cards.
******************************************************************************

Saturdays Game

I put on the same game on Saturday but was too frazzled to take enough pictures to document the game. It was a little more interesting as we got into some fisticuffs and had a different ending.
Force Morale at the end was British 4 and the French 5, but the Spanish Guerrillas held the Bridge. I would have to call it a draw as it could have gone either way. It was much more interesting game. The British 89th was charged a couple of times and was very shaky at the end. I think the French even used a Pas de Charge. Wish I taken more pictures, but here are three that show some of the action.

French side shortly after the Deployment turn. As in the first game most of the troops race down the road to get to the Bridge. The commander of the 4th Polish however took a different tack and headed straight across the field to get into action.

 The British side after deployment with the Spanish in the lead


 This is at the end of the game. The Guerrillas hold the Bridge way down at the end of the table. The Spanish Fusiliers and the 45th British are opposed by two Formations of French Line. All have taken a fair amount of Shock. The Poles are in the foreground after having driven the 89th back in Fisticuffs. This was after rolling a "9" of the shooting random event Table: (“Charge them to Hell!” Inspired by their volley and convinced the enemy is done for, the firers surge
forward 2D6 inches. If they make contact, they fight Fisticuffs immediately and are counted as
Aggressive in the first round of that fight.  )

Hope you found this interesting. Comments always welcome and if you are in the Pacific Northwest next May, check out the NHMGS ENFILADE Convention.

Thursday, February 15, 2018

Pas de Charge vs Thin Red Line

This is a play test of a Scenario I am planning to run at the NHMGS ENFILADE Convention in May, 2018. (For more on Enfilade see here: http://www.nhmgscitadel.com/enfilade/ )

For this Scenario we have two fairly equal Napoleonic forces both trying to capture a bridge somewhere in Spain. They approach from opposite sides of the map with a ridge of difficult terrain between them. The British because of the Riflemen, have a higher Points total so the forces are balanced by the French taking a Secondary and a Movable Deployment Point as Support Options. Whomever holds the Bridge or drives the opposite side Force Morale to zero wins the game. French enter from the top road, the British at the bottom. Tan spaces are difficult terrain and woods are light cover. Low stone wall provides light cover and is a minor obstacle. River is un-fordable.


Each side has three Groups of Regulars and three Groups of Skirmishers. One Group of French Skirmishers are dismounted Dragoons and one Group of British Skirmishers are Spanish Guerillas. At Enfilade, I was planning to use some Vistula Legion troops so have upgraded the French to use the Polish Stats instead of the normal French values. Doing so also allows me to use equal numbers of troops on each side. Below is the Roster and Troops values. You can see each side has five leaders, one level III, one level II and three level I's. Force Morale starts at ten for each side

To keep the game moving, I made two mods to the rules. One, the first movement die roll is always a "six". This gets rid of a lot of fiddly movement and progresses the game better. none of this moving only two inches with a bad die roll. Second, we used two Tiffin cards to give everyone a better chance of getting to activate during the turn. Turn doesn't end until second Tiffin card is drawn, but if one comes up as first card,that an "End of Chapter" event.

 A view of the table layout. Troops at the end aren't really there. They're just staged there in preparation for being deployed.
 

On the first turn,  French Leaders 2 and 4 cards come up and they can deploy their skirmishers up to 18" away using the secondary Deployment Point. Group Sk1 heads for the central rough ground while Group Sk2 heads for the upper woods. On the British side, Leader 2, Lt. Rod Stiffington and overall commander Leader 1, Capt Harry Baals are both activated brinking Sk1 and the main line with them. Lt. Stiffington heads toward the central woods with Group Sk1 and Ldr 1 heads down the road with Groups Ln1 and Ln2. He detached Group Ln3 with Sgt.Bonner to support the skirmishers.


French Deployment of skirmisher Groups Sk1 & Sk2 with Ldr 2, Lt. Alain Contri and Ldr 4, Sgt. Emil Fortu

Initial British Deployment. British Ldr1, Capt. Harry Baals has dispatched Ldr 4, Sgt Sirius Bonner with Ln3 off on their own.


In the next couple of turns the remaining Forces all arrive.  French Leader 1, Capt Marcel Surbuti deploys at the 2nd DP with the French Line troops and promptly marches down the road in column. The Spanish Guerillas( Group Sk3) and the other British Riflemen (Group Sk2) arrive with their respective leaders and head towards the center of the field. Capt Baals with the main Groups of British Line continue marching down the road. Sgt Bonner with Ln3 figures the skirmishers have enough support and heads off to support his Captain. Meanwhile both French and British skirmish Groups Sk1 head into the adjacent woods and begin trading shots with each other. Three French and two British skirmishers are soon killed and each Group begins to accumulate some shock. Some where in this turn or the next few, French Ldr 2, Lt. Contri is wounded and drops to a level one. The other French Skirmisher Group( Sk2), also moves into the adjacent woods and begins trading fire with the Spanish and British Sk2. Finally, French Dragoon Lt.Odur is activated and they deploy from the Movable DP into the walled grape orchard.


View of the British side of the field. Regulars with Capt Baal marching down the road toward the bridge. Sgt Bonner slightly behind with Group Ln3. French skirmishers in the foreground. Amazingly the Spanish Guerillas and British Riflemen Sk2 took no casualties in spite of spending quite a bit of time in the open. They did take some Shock though.

Capt. Surbuti marching down the road with all three Groups of French Line. Dragoons are taking cover behind the orchard walls which gave light cover.


Before the main French column advances down the road, the French Dragoons take a couple of casualties from the British Ln1 & Ln2 who are deploying into Line formation. British Riflemen Group Sk2 decide being in the open is no fun and move into cover of the woods. British Skirmish Group Sk1 takes another casualty in their fire fight with the French skirmishers.


French column bravely advances down the road after British have put a couple of casualties on the Dragoon skirmishers, Sk3. Whomever gets Initiative first next turn may be the deciding factor.

 
British Riflemen Group Sk2 wisely moves into the cover of the woods.Spanish have luckily accumulated no casualties, but are incurring Shock. Other Skirmisher groups continue trading fire.


Capt.Surbuti(French Ldr 1) has his troops deploy into Line and they get some good shots into the British Line causing about five kills. They take one kill in return plus some Shock. The French Dragoons get a kill on British Ln3, but are charged by them and suffer badly. The Dragoons rout back and due to excess Shock retire off the field. Elsewhere the Spanish Guerillas finally decide to move into cover. Sporadic skirmishing fire continues between the opposing skirmishers. Loss of the Dragoons and their leader along with the previously wounded Ldr 2, reduces French Force Morale from 10 to 5. 


French Line put some casualties on the British Line. They have three Groups to two so its understandable. British Ln3 has driven the Dragoons off in spite of the Dragoons have the advantage of defending an obstacle. Skirmishers must be no match for Line troops. A nice melee result for the British which may allow them to put some enfilading fire into the French Line.
 

View of firefight from the British side. Shock is building up on some units so something will eventually give.


 A very decisive turn. British Ln3 moves to flank the French Line but their firing is poor and only causes a few Shock. French Ldr1 next gets Initiative and with two Command Flags activates his formation with the Pas de Charge characteristic. This allows them to remove 2 Shock per Group and charge with 3D6. They just make it to the British Line and defeat them by 4 which with the extra Shock incurred, puts puts them off the field. British Force Morale drops from ten to three. Ouch!
Elsewhere both skirmish Groups Sk1 suffer another casualty.


Just before the French charge, British ln3 maneuvers to flank the French.
 
After the Charge. Most of figures by the hill are British casualties. Those remaining to right of hand, will withdraw  off table due to excess Shock. French line incurred quite a bit of Shock so British still have a chance to turn things around


Status of things after the French charge and melee. French Ldr 5, Sgt Leelair was also wounded in the melee.

Final turn. French Skirmish Group Sk1 has taken enough Shock that they have to withdraw reducing French Force Morale to five. Capt Surbuti gets the French Line to turn around and put some fire into remaining British Group Ln3. That along with some additional fire from French Sk2 is enough to wipe out British Ln3 reducing British Force Morale to zero.


British skirmishers all trying to put some hits onto the French Line. Unfortunately for them, the luck seem to be with the French this day. British Group Ln3 is wiped out before the French can be broken.

Thanks to Kevin Walker and Tom Condon for playing the British and to Gary Williams for so adroitly yet reluctantly(he doesn't like SP) handling the French Line troops in the roll of Captain Surbuti. I probably made some errors in this write up, but it was the best I could remember. I for one thoroughly enjoyed the game and it was good to see the French be able to use Pas de Charge to good effect for once in a game.

Some players don't like the card driven mechanics of the game because it can result in some players not being able to do anything. That's why we used two Tiffin cards, but it can still happen that some Leaders don't get activated, sometimes for a few turns. I've come to the conclusion,that SP is meant to be played between just two players. That way one almost always totally engaged in the game. With group or convention games with multiple players, some one is invariably going to get left sitting around watching other guys play. Anyone have a good fix for that, please let me know.

Hope you enjoyed this write up. Same but bigger scenario to be played at Enfilade, Memorial day weekend in Olympia, WA. We'll see there if Pas de Charge or Thin Red Line can make a difference.