First, I do think it’s worth answering a few questions directly.
Firstly, will the rules look like the first edition in terms of
production values? The categoric answer here is “No, definitely not”.
The first edition was published a LONG time ago when pretty much all
historical wargames were in black and white. This edition will be in
full colour with LOTS of illustrations to explain the rules and a fair
amount of very high quality photographs of games in play to inspire us
all.
Secondly, is it evolution or revolution? Actually, it will be both.
Since the original version of the rules were published the hobby as a
whole has come a long way in terms of the type of games people want to
play. In some respects we will remain very true to enabling the gamer
to play a great game in the black powder era without the need for huge
armies, but in terms of the rules the changes are revolutionary in that
they incorporate all of the lessons we’ve learnt in the last ten years
and then some on top.
The new edition of the rules is VERY streamlined when compared with
the original (as we will see below when se see a game in play) and is
true to the design brief which we used for Chain of Command in that we
want the game systems to be simple so that the players can focus on the
command decisions to me made. And there are plenty of them thanks to
the troops rating system and the Command Card system.
Talking of which, I say Command Cards as though you’ll need a deck of
cards to play Sharp Practice. In fact you’ll have a choice. A lot of
players seem to prefer to use poker chips to draw them from a bag or
mug; as a result we will be offering either cards or chips (or both if
you want to be greedy!) alongside the main rules. For today’s game I am
going to be using poker chips so you can see how simple they can be to
use. Here are the chips we used for today’s game.

The numbered chits are for the force Leaders, so red 1 is the British
force commander, and the flags are Command cards which represent what
can best be described as “surges” of initiative. It is these surges
which can get your troops operating more effectively than average Joes.
What we are looking to achieve is what a wise man from Sheffield called
“three rounds a bloody minute”.
Anyway, Nick and I wanted to play a moderate sized game so we went
for a core force of around 65 points. Here’s his British force
selection.
British Force: 67 points for core force.
Line Infantry: 30 points
Three Groups of 8 men
One Leader Status III
Light Infantry: 25 points
Two Groups of 8 men
One Leader Status II
One Leader Status I
Loyalist Rangers: 12 points
One Group of six men, rifle armed
I wanted to maximise my force for the defence in depth scenario we
were to play and, to be honest, I wanted to select something very
different to his force to allow you to see some contrast between troop
types. Here’s my selection.
Rebellious Colonists: 65 points
Continental Line: 33 points
Three Groups of 8 men
One Leader Status III
One Leader Status I
State Militia: 22 points
Four Groups of 10 men
Leader Status II
Militia Skirmishers: 10 points
One Group of six Irregular Skirmishers
Leader, Status I

As you can see, the Militia forma big lump of men, but it would be my
Continentals who I expected to be the rock on which his
lobster-coloured tide broke.
Anyway, the British were the attackers in this games, so they got
1D6+6 points of support. They rolled 4 allowing them 10 points.
However, they have already chosen two points more than the Americans so
they now added just 8 points. They chose as follows:
One Leader Status I to add to the Regulars for 3 points
A mule train with one resupply of ammunition and water
A Scout for 1 point
The Scout doesn’t actually appear on the table, but allowed the
British to put together a bit of a flank march by deploying a secondary
Deployment Point. You can see that in the picture below as a round
circle with the old Union Flag on it.

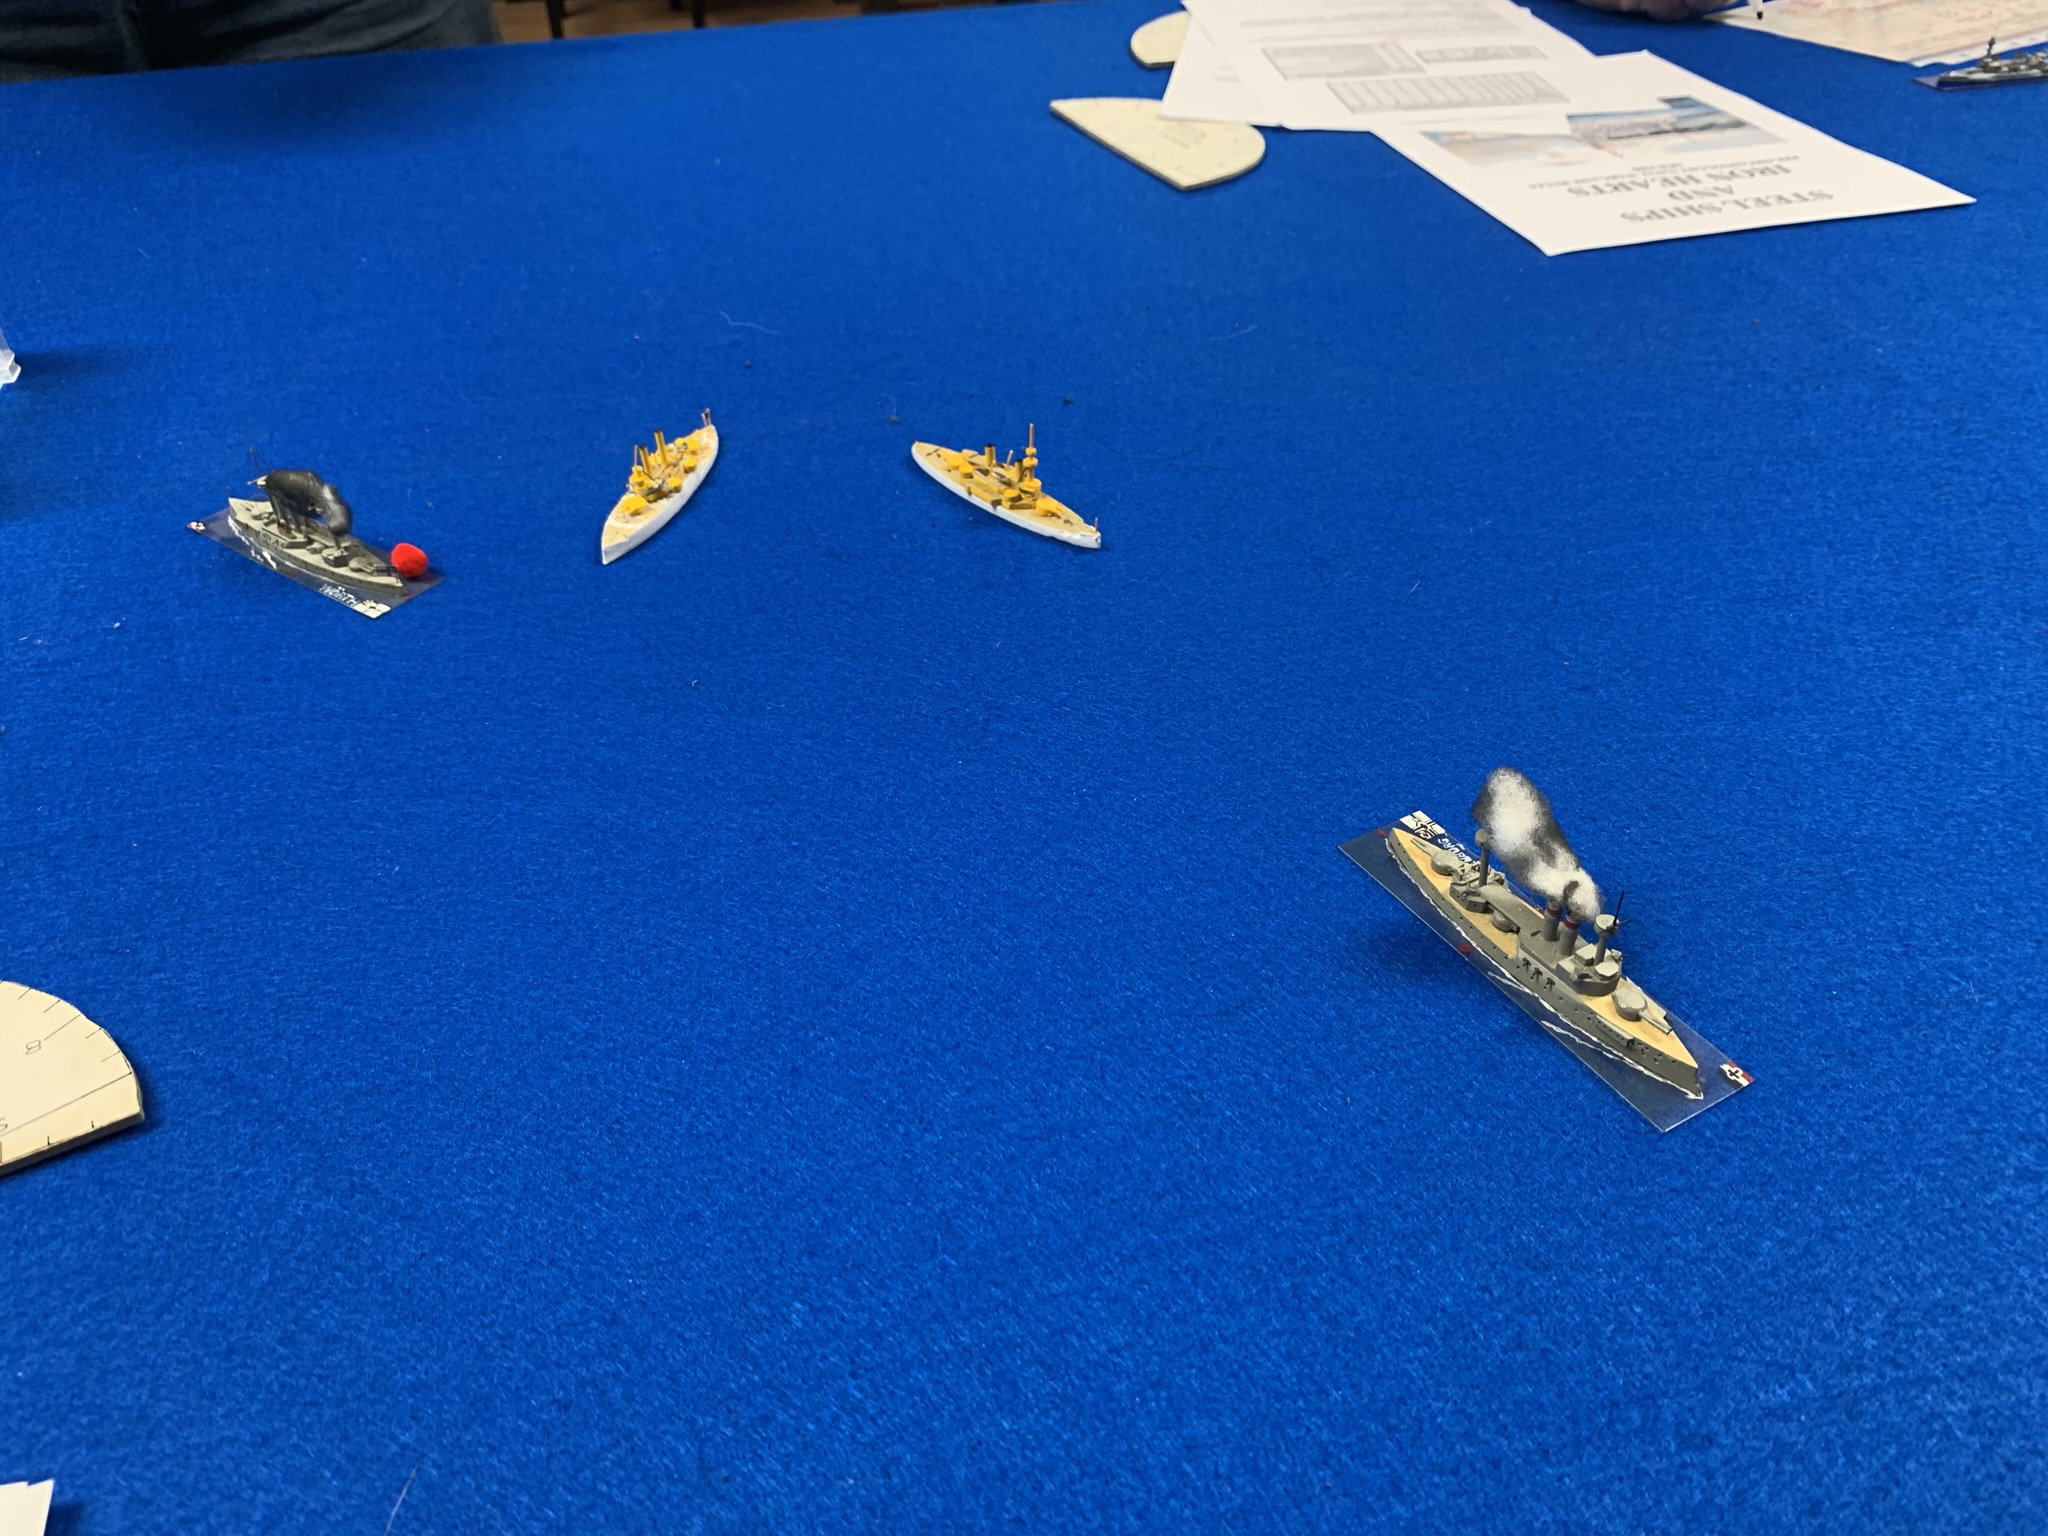
So, let us see out initial set up. Here’s the table. You’ll see
that the Colonists get two Deployment Points in this scenarios, one
being their main Deployment Point which also represents their route of
withdrawal were they to lose, so is very important to protect, the other
being secondary and entirely expendable. These are marked in Blue.
Obviously, the main one is at the back on the ridge, the secondary one
is in the woodland near the centre of the table.

The British main Deployment Point is on the road, bottom right, and
their secondary Deployment Point, achieved by selecting a Scout, is in
the orchard to the right. As we look at this it seems that the
secondary one is not much of an advantage to the British, but this is
where the deployment system comes in to play. Let’s see how this works
before we begin the game.
At the start of the game no troops are deployed on the table. The
order in which troops deploy is governed by the run of the cards or
chips, with troops deploying under their commanders when they are
activated. So, for a simple example, when the Red 1 chip is drawn, the
British overall commander can deploy with the unit he is attached to, in
this case the three Groups of British Line. When Red 5 is drawn, the
Loyalist Ranger Leader may deploy with his single group of skirmishers.
I say “may” as they do not have to deploy onto the table on the first
time their card or chip is drawn, they can decide to remain concealed
until a subsequent activation. We will see this in the game as I try to
keep my second line in reserve until it is needed.
When troops do deploy onto the table, they do so by using the
Deployment Points. Normally, Line troops must deploy within 6″ of a DP
(let’s call them DP’s to save my typing fingers) , formed Light Infantry
can deploy 9″ away and Skirmishers 12″ and Scouting Cavalry 18″. There
are some other variants, such as cavalry and artillery, but these will
do for our play through here. One key thing to remember is that troops
who are defending in a scenario can add 6″ to this distance and that any
troops who are deploying into a hidden position can add a further 6″.
So, here are some options on our table.
You can see that the British DP o the right would allow Nick’s
Rangers to deploy into a firing position on the skirts of the orchard
and that the American DPs allow Infantry to deploy 12″ out (as they are
defenders they get an additional 6″ distance) onto the fence lines.
Indeed, if the Colonists wanted to deploy behind the wood, into a
hidden position, that could be stretched to 18″. What we have sought to
do with the deployment rules is to speed the action along to the point
where first contact is about to be made. This gets us straight into the
action and saves a lot of time on club nights and also makes deployment
decisions crucial. We will see plenty of this during our game, so
let’s get playing.
We start the game with a roll each to establish our Force Morale. My
roll is enhanced as the majority of my troops are defending “Hearth
& Home” (one of the reason I selected so many militia), but Nick and
I both end up starting on 9. Not bad, not great. It ranges between 8
and 11.
Turn One
For the early moves I will list the chips we draw in order so you can
see what’s happening. Later I will move to a more narrative style with
only the important points highlighted, or we’ll be here all day (the pub
opens in two and a half hours and the wife has gone out for the day!).
For ease of typing, I am going to call the Command Point chits “Flags”
as that’s the image they have on them.
Red Flag. Nothing can be done with this chip until a Red Leader card
is dealt, so it remains in play, placed on the table to be used when
the red player wishes.
Red 1. The Red commander deploys his Line units onto the table in column, all within 6″ of the main DP.

Red 5. The Queen’s Rangers Leader deploys his Group of Skirmishers
into the orchard, 12″ from secondary DP. If he’d been completely hidden
he could have deployed 18″ on, but that would put him in line of sight
of the enemy primary DP so that isn’t possible.
Blue Flag
Blue Flag. These two are left in play. On their own they are useless.
However, if we get a third Blue Flag that would allow a Leader not yet
activated to activate and deploy onto the table if the American player
wished.
Blue 4. This is the American Skirmish group Leader. I decide
(wrongly!) to leave him hidden and don’t deploy. Sometimes I am world
class thick. I could see the Rangers from the hill at the rear, but I
miss the opportunity.
Red 4. This is the subordinate Leader in the Light Infantry force.
As I want to deploy them as a combined Formation (i.e. two groups
joined together as a larger body, rather than two groups acting
individually), I ignore this card and wait for the Officer commanding
the Light Infantry to be dealt.
Red Flag. There are two of these in play now, but I have no use for them yet.
Blue Flag. That’s the third one of these in play and, as hinted at
above, I use them to activate my Militia commander and deploy his force
on the fence line.

This deployment is somewhat earlier than I would have liked, but the
Rangers on my left worry me as they can move pretty quickly and I don’t
want them to seize the wood by a coup de main and stop me deploying from my secondary DP.
Red Flag. There are three of these in play so Nick could do just
what I have done and deploy a Leader (and his men) who hasn’t yet been
activated. However, he decides to keep his powder dry.
Blue 3. That’s my militia Leader. I have already activated him with the three Blue flags, so this card is ignored.
Tiffin. That’s it the Turn ends. There are three Red Flags in play,
but the British have missed their chance to play them together in order
to activate or deploy a Leader. At the end of the Turn any Flag cards
in play allow the player to activate one group or Formation which hasn’t
been activated during the Turn. However, this is only troops on the
table. In this case Fatty missed his chance.
We now chuck all of the chips into the mug and give them a shake. If
we were using cards we would shuffle them before beginning the next
turn.
Turn Two
Blue 4 is first out,. Having missed my chance in the last Turn, I
deploy my Leader and his Irregular Skirmishers onto the rear fence rail
and open fire on the Rangers. It’s long range for rifles, 0ver 24″, so
normally I’d hit on a 6. However, these are skirmish troops so that
moves to 5 (we presume that the bets shots are used for skirmishing)
and it’s my first shot in the game with this group so their weapons are
well loaded with a measured charge of powder and a well wrapped ball,
this gives me an additional +1 so I need 4, 5 or 6 to hit. It’s six men
plus a Status I leader, so that’s seven dice. I roll 4 hits which
inflicts one dead and two Shock on the Rangers. A fine start for the
American riflemen.

A slight diversion here for the uninitiated. For each hit we
roll a D6 to see the effect. This is influenced by what cover the
target is in and, in this case, the fact that the Rangers are
skirmishers. The orchard is light cover, but being skirmishers they are
presumed to be using the best cover possible, so that becomes hard
cover. Only 6’s kill and 5’s cause Shock, as a result, two Shock and
one dead is a very good result for my rebels. More on what Shock does
later, for now just think of it as negative cohesion points.
Blue Flag
Blue Flag
Red 1. Nick deploys his infantry into Line in preparation for an advance against my Militia.
Red 3. This was the card Nick was waiting for. His Light Infantry
officer. He deploys his two Light Groups in column on the road 9″ from
the main DP.

Blue 2. This is the second in command of my Continentals. They are
hidden and remain so. Had I wished, he could have deployed with one or
two Groups of these troops, leaving the rest with the overall force
commander, Blue 1, but my plan is to let my militia soften up the
bloody-back British before they get to my second line position.
Red 5. The Rangers ignore the American skirmishers and fire into the
Militia line, their primary mission is to soften these up for Nick’s
British line to attack. They have five men and a Status I leader, so
normally that would be six dice. However, they have two points of
Shock, so this is reduced to five dice. They roll and get four hits.
Because the militia are in a formation of four Groups the hits are
spread across all of those groups (its a big benefit when trying to keep
your formation fighting to have the effects spread rather than
concentrated). As it is, this translates into two dead but no Shock.
Red Flag
Red Flag
Blue 3. This is my militia Leader. Musket armed, they are outside
the 24″ range of the British Line. I could split off one or two groups
to face off the Rangers, but if I divide my force the British line will
make mincemeat of it, so I do nothing but stand and wait. Had the
Rangers inflicted Shock rather than kills, I could have rallied off two
points as the militia leader is Status II, but whilst I can remove Shock
I cannot resurrect the dead.
Tiffin. There are two Blue and two Red flags in play. This would
allow both sides to activate two units which hadn’t been activated, but
as it is we have activated all of our troops on the table, so these are
ignored. All chips are returned to the pot for the next turn.
Turn Three
Red Flag
Red Five. The Rangers Leader immediately picks up the Red Flag and
uses it to rally one point of Shock and then uses his one single command
Initiative to get his men to fire at the militia. Their Shock reduced
to one point, they now fire with six dice. At effective range (12″ to
24″) with rifles, he’d normally hit on 5 or 6, but he gets the
Skirmisher bones so that’s 4,5 or 6. He gets 4 hits, again spread
across all four militia Groups, but a terrible roll by me sees that
become three dead. Ouch! Fortunately the one group which didn’t suffer
a loss was the one which my Militia Leader is attached to, so he
doesn’t have to test to see if his is hit. I am grateful for small
mercies…
Red 2. This is the NCO with the British Line. He has nothing to do
as he is just there to support his boss when things heat up, so we move
on.
Blue 4. That’s my American Skirmishers. They fire on the Rangers
and kill one man, but by luck this is the Ranger Leader. He is wounded
which reduces his Status to zero. That’s potentially a nightmare for
Nick as he has no Command Initiative now and can only use Flags in play
to activate or rally his men. A big win for me, as the British Force
Morale dips to 8.
Blue 1. This Leader remains hidden with his force
Blue Flag
Blue Flag
Red Flag. Three flags in a row, whatever the colour, means a random
event will occur if the last unit activated moved or fired. The Rangers
were last so we roll. Random events are not huge game changing effects
and can be good as well as negative. In this case the Rangers get an
additional firing related action, so they complete reloading their
rifles which are slower to load than muskets. a nice result for them.
Blue 3. The militia Leader still stands and waits.
Red Flag
Red 3. The Light Infantry commander uses one Red Flag to enhance his
movement. The thrusting Light Infantry troops can do this for just one
Flag, other troops may need two or three Flags to do the same, or like
the American militia, may not be able to do it at all. With there 4D6
of movement (two normal plus one for the road column, plus one for the
Flag) the Light Bobs surge forward to threaten the militia left.

For those who recall the original Bonus Deck in the original
rules, this has now been completely subsumed into the Command Card
mechanism. No need for a separate Deck as before, the Command Cards
combined with the troop ratings provide a whole menu of things you can
do to enhance fire, movement, drill and more just using the flag cards
or chips in the normal Game Deck. It’s a much simpler mechanism but one
with many more nuances.
Red 1. The line shall advance. And it does, into range of the Militia.
Blue 2. Still hidden.
Red 4. This is the subordinate Light Infantry commander and he has
nothing to do as, like Red 2, he is just there to support his boss.
Where this happens in future I will simply note “subordinate”. These
blokes are great for rallying off shock in the heat of the action and
assisting with formation changes, but it’s the officer who commands the
formation.
Tiffin. Three Blue flags and one red flag are in play, but everyone was activated.
Turn Four
Red 2. Subordinate
Red Flag
Blue 4. The skirmishers kill another Ranger. They really are rather good at this.
Blue Flag
Tiffin. This is interesting as it gives us a chance to see what
happens in a short turn. We have one flag of each colour in play. Blue
has the higher force morale so they get to use theirs first (the side
with most flags usually goes first, but this is a tie). The Militia are
just in range of the British Line. They are at long range with muskets
(12″ to 24″) so need 6’s. However, it’s their first fire and they get a
+1, requiring 5 or 6. They cause 8 hits which, as the British line is a
formation, is spread over the three Groups. They kill one man and
cause four Shock. With our second action we reload.
Now the British line is activated on their flag. They use their
first Action (they, like all troops, get two Actions when activated) to
present and their second to fire. This measured approach allows them to
fire “controlled volleys”, something my militia couldn’t do in a month
of Sundays. They are at long range, but a controlled volley gets them a
+1 as does first fire, they hit of 4 to 6. Their 24 men cause 12
hits (better than my 40 men!) which is spread across my four groups.
They kill two men and cause five points of Shock.

The British are now completely unloaded, we mark that with the kapok
seen above. It looks rather spiffing in the photo. As you’ll note, the
controlled volley is slower, but more effective. If the British can
combine this with their unit characteristic, Sharp Practice, using two
flags, their rate of fire will increase and their lethality likewise.
This is where the use for Flags (more properly Command Cards) makes for
an interesting game. How, on what and when you play them has a
significant influence on the effectiveness of your troops.
Okay, one more turn in detail and then we’ll go narrative…
Turn Five
Blue Flag
Red Flag
Red 2. Remember our NCO who we said was just there to assist his
boss? Well this is his moment. He now rallies one point of Shock of
the British line. He could have picked up the flag and made that two
Shock rallied, but the British really want to use their Sharp Practice
(for two flags) or Crashing Volley options (also for two flags) to get
the militia really rattled.
Blue 3. The Militia leader uses the Blue flag to allow him to rally
two Shock before using his remaining Command Initiative to fire his men.
One British dead and two Shock.
Red 4. Subordinate Light Infantry.
Red 3. The Light Infantry officer breaks his column into two groups
so as to get a better field of fire and they open fire on the militia.
The yankees are lucky to only lose two dead and one shock.

You can see that I am using little red “gems” to show Shock.
Normally we use ore discrete micro-dice, but for your benefit these are
more prominent.
Red Flag
Blue 1. Hidden
Blue Flag
Red Flag
Blue 4. Unsurprisingly, the rebel skirmishers kill another Ranger.
Blue flag
Red flag. There are four Red flags out now. That is a complete
bonus activation for any Leader, whether he has already activated or
not. Nick activates the Line who load with one Action and Present with
the next.
Red 5. The Ranger leader has no flag so cannot activate.
Red 1. The British Line leader was activated with four Flags, but is
is a bonus activation, so he does not count as already having been
activated in this turn so may now activate again. His line fires a
controlled volley with one action and advances with the second. As we
could see above, one point of Shock on each Group reduces the
formation’s move by 1″. They roll 6″ but only move 5″.

The rebel militia is looking shaky to say the least. The British
have advanced into close range and the real killing will now begin. As
the American commander I need to decide whether the damage they will
potentially now inflict is more importance than the loss of my own Force
Morale if I leave my militia in line too long and they all rout off the
table.
Tiffin. The American have flags in play, but they have all activated, so we “reshuffle”. For the next turn.
Turn Six. The next turn sees the rebel militia under more fire from
the Light Infantry. It’s my job to slow down the British and inflict
what casualties I can before falling back with what I can salvage to
form a second line. When Blue 3 comes up he uses a flag to activate
three Groups, attempting to break them from the formation to run back to
the next fence line. However, his troops have been firing uncontrolled
volleys and, in the smoke and noise, only two Groups actually turn and
run. The rest keep firing even though they have no target immediately
before them.
Seeing the rebels run, the British Line uses two flags to “Step out”
(remember the enhanced movement that the Lights needed just one flag to
do?) and they rush towards the fence.

On the road, the Light Infantry now move forward to try to catch the fleeing rebels.

However, the rebel militia commander grabs four Blue Flags and
abandons half of his force, ushering the rest of his men back towards
the second line position. By running with an additional dice they lose
all order and take more Shock, but it is worth it to try to save the
remnants of this force. Whether they can rally up in time to form up
again is another question. A fortuitous run of chips which allowed a
well times bonus.